Turning the M1A into a match rifle. Part Two

Turning a rack M1A into a match rifle.
Written By: Brandon Pritchard, Master Gunsmith at Freedom Forge Armory
Photos By: Freedom Forge Armory
Second Instalment
In the first part we talked about accurizing the M1A / M14 using the existing parts that came with the gun off the rack. Now here’s where you have to decide if you want to spend the money. To squeeze anything more out of this rifle we’ve got to start upgrading and modifying certain parts to National Match Standards.
(National Match parts have much tighter tolerances than standard mil spec parts. The mil spec parts are designed with a looser fit to allow for debris and fouling that will occur under combat conditions. What this means is, a part that is NM spec is the absolute minimum tolerance allowed for sanctioned matches. While a mil spec part may be made to the maximum tolerance.)
The spring guide, gas piston, gas cylinder, sights, flash suppressor will all be changed or modified to NM standards. In addition there’s some work to do on the handguard too. Unless you have a good deal of experience with these rifles, the following is best left to a gunsmith that is familiar with the M1A. Special tools are required, the parts are expensive, and the tolerances are very tight usually requiring hand fitting. So the goal now is to get the rifle to shoot at 1 MOA or better. For these modifications I’m going to be using national match parts from Sadlak Industries, Fulton Armory, or doing the modifications myself.
The sights, standard M14 sights are “battle sights”, they are for hitting man sized targets. So what we need is a much finer sight picture. National Match sights are the answer. These sights have a finer front blade, smaller rear aperture, and finer windage and elevation adjustments over the GI sights. Multiple aperture sizes are available. If you don’t do any other mod beyond the things discussed in the first article, do this one. This upgrade should cost around $180 for all of the sight parts needed. I’m going to swap out the rear battle sight for a non-hooded style NM rear sight assembly, the front sight is already a NM sight.

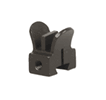
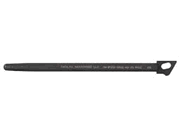
M14 GI sights

M14 NM hooded sights
Gas piston. We’re going to swap out that GI piston we polished in the first instalment for a Sadlak Tin NM piston. This piston has coating and is made to a tighter tolerance to equalize the pressure for more controlled operation and reduced vibration. This is far and away the best M1A NM piston on the market right now. It’s worth point out that Sadlak makes this piston with a groove cut in the top too. This grooved piston works best with hotter match ammo and standard pressure BALL ammo may not function properly. The Sadlak grooved Tin piston runs around $70 and the non-grooved piston is around $60.
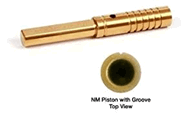
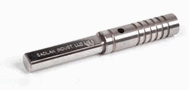
Sadlak grooved NM piston Sadlak no grove NM pistons
The gas cylinder and gas cylinder plug. Sense we’ve gone to a NM piston we need to go to a NM gas cylinder. A true NM cylinder has the front band welded on for a solid lock up with the stock, the small parts from the GI cylinder can be reused to build up a new one. There is another method worth pointing out here, the GI cylinder can be shimmed for a tighter fit to the barrel as an alternative. Over the years I’ve found no appreciable difference between to the methods, and personally prefer to use the shims to get a tighter custom fit. The NM gas cylinder can be bought from Fulton Armory for $210. The shim set is $20 from Brownells. I’m going to polish the inside of this cylinder and shim it for a NM fit. Why is tightening up the gas cylinder to barrel and stock fit important? An M1A barrel can’t be floated like and AR, so in order to minimize barrel whip and movement the action, barrel, and gas cylinder must be solidly locked up to the barrel and stock. By using the NM gas cylinder or shims to get it solidly locked up, any movement is eliminated.
GI cylinder without the front band
NM cylinder with the front band welded on.

M1A barrel shim set
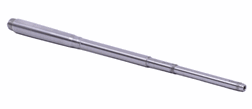
The spring guide, The GI spring guide that came with the gun is a sheet metal stamping, it flexes a lot during firing, so it’s getting replaced with a Sadlak NM spring guide. The NM guide is a milled rod that controls the spring and greatly dampens vibration The NM op rod spring guide costs around $45. Speaking of springs you can also upgrade all of the springs to silicone steel or increased power springs, there is a lot of conjecture on if these springs make any difference. Right now I’m going to stay with the stock springs.
GI spring guide
Sadlak NM Guide
Flash suppressor, the NM flash suppressor has a larger inner diameter than the GI suppressor. The larger diameter mean less disruption of the air around the bullet with each shot. You can get one from Fulton Armory for $75. I am going to use a taper reamer to bore the stock flash suppressor out to the correct inner diameter, this was the same method used by the AMU.
The last thing I’m going to do to this rifle is relieve the handguard off of the stock. I’m going to take a few hundredths off the sides so that the handguard is floating 0.080” above the stock. Even this small force can act on the barrels point of aim.
That’s all I can do for now without going to a match barrel and oprod guide. All total we’ve spent around $565 for parts to make this rifle competitive. Once again I’ll head to the range to see how it does.
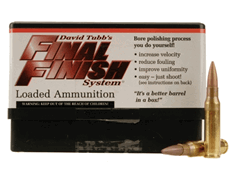
Before shooting the record test groups I’m going to lap the bore. Lapping the bore is done with specially made lapping rounds. These came from Tubbs Final Finish System, $40 for 20 rounds. The rounds are made of two different grits and are fired in groups of five with cleaning in between each group. What lapping does is smooth out any imperfections in the bore and makes the rifle easier to clean. Supposedly it also aids in accuracy but I’ve had mixed results with other rifles. It’s one of those things that may not help, but it won’t hurt either.
Lapping completed it’s time for testing again with Hornady .308, 168gr HPBT MATCH. I’ll fire a few groups starting a 36 yards to reset the zero, all of the shooting will be with the rifle benched and in a sled, I want to remove all of the human factor from this test.

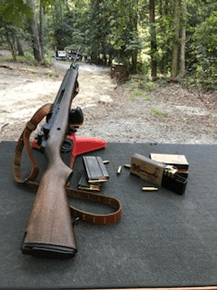
Cadwell Sled used for testing. The rebuilt M1A after zeroing.
I shot a few groups to get it on paper, and then confirmed the zero. I’ll adjust my dope on the sights as I do more load development. That’s pretty tight, three rounds almost through the same hole. Now to get a true feel for how the work we did changed this rifle lets back it up to 100 yards, remember that 1” at 100 yards equals 1 MOA. Again all the shooting will be done off the bench and with the rifle in a sled, we want to see how the rifle performs.
 Zero conformation group with Hornady 168gr HPBT Match
Almost no change, right at 3/4 MOA I’d say, that’s enough to get you shooting in the 390’s to 410’s. NRA and CMP high power matches are shot out to distances of 600 yards. So that would be a 6” spread at 600 yards not factoring in wind or other conditions, versus what the Field Manual says is acceptable (6 MOA at 100 yards).
(The first group of three is a little low and right at 100 yards in the nine ring, but that’s ok for now. I made some sight adjustments and fired a second group 2-X. This is all part of the developing the dope on the rifle.)
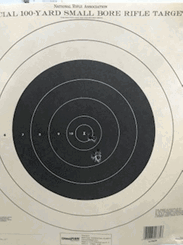
Groups shot at 100 yards Hornady 168gr HPBT Match
So is that all we can do to this gun? No, the GI barrel can be replaced with a match barrel from Criterion, Kreiger, or Douglas. The bolt lugs, face, and chamber can be polished. The action can be glass bedded into a McMillan match stock. The receiver can be replaced with a rear lugged receiver, and I could develop a custom load for this rifle. Then I’ve truly done everything that can be done to improve the accuracy of the M1A, and there would be nothing left of the original gun. For a quality match barrel plan to spend between $300 and $600. To make an off the rack M1A truly competitive today you would end up buying the gun twice or even three times just in parts. This doesn’t include any of the special tools needed or what a skilled gunsmith would charge for the work. If I were to build this rifle for a customer, I would start with a stripped rear lugged receiver and heavy match barrel with a 1-10 RH twist, and build it up to a match rifle. It would be much more economical in the long run, but this has been a really fun project to see how far we could take an off the rack M1A and using some of the techniques the AMU came up with to accurize this rifle. I will defiantly shoot this rifle in local high power matches where titles aren’t on the line, and the Springfield matches where the guns are mostly evenly matched.
 Kreiger medium contour, 1-10 NM, 22” barrel National Match rear lug M1A receiver
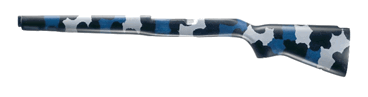 McMillan M1A match rifle stock
In conclusion, perhaps we’ll finally see the end of the M1A and M14 in competition with the introduction of optics in the service rifle division, and military use as the services adopt versions of the AR10 to fill the DMR role, though I doubt it will disappear entirely. In a world dominated by polymer and aluminum there is something nostalgic about dark walnut, parkerized steel, and gravel belly 30 caliber cartridges, that harkens back to the heyday of the National Matches and service rifle competition. The M1A and M14 are a rifleman’s rifle, they are not forgiving to the shooter and they still command a great deal of respect and admiration on the range. As long as Springfield and a few other companies are still making them I imagine this old rifle will soldier on for years to come if only at family range days.
Now get out there and go shooting.