Building a Galil AR from a kit. Part Two

Written by Brandon Pritchard, Master Gunsmith
Photos by Freedom Forge Armory
Galil build part two, putting it all together.
I would like to extend my thanks Cameron S. for his expertise and help, and for providing the special AK tools, with out them this build would not have been possible.
In part one I reclaimed the parts out of the old kit and now that I've got the receiver I'm going to put it all together.
I've got my receiver from Tortort Manufacturing and it was worth the wait. One of the big problems a lot of Galil builds run into is out of spec receivers. If the receiver is out of spec it's a waste of time to try and put it together. The Galil receiver is complex and difficult to manufacture and there's two companies that make high quality in spec receivers (CNC Warrior and Tortort Manufacturing.) If you plan on building a Galil out of parts do yourself a favor and get a receiver from Tortort.
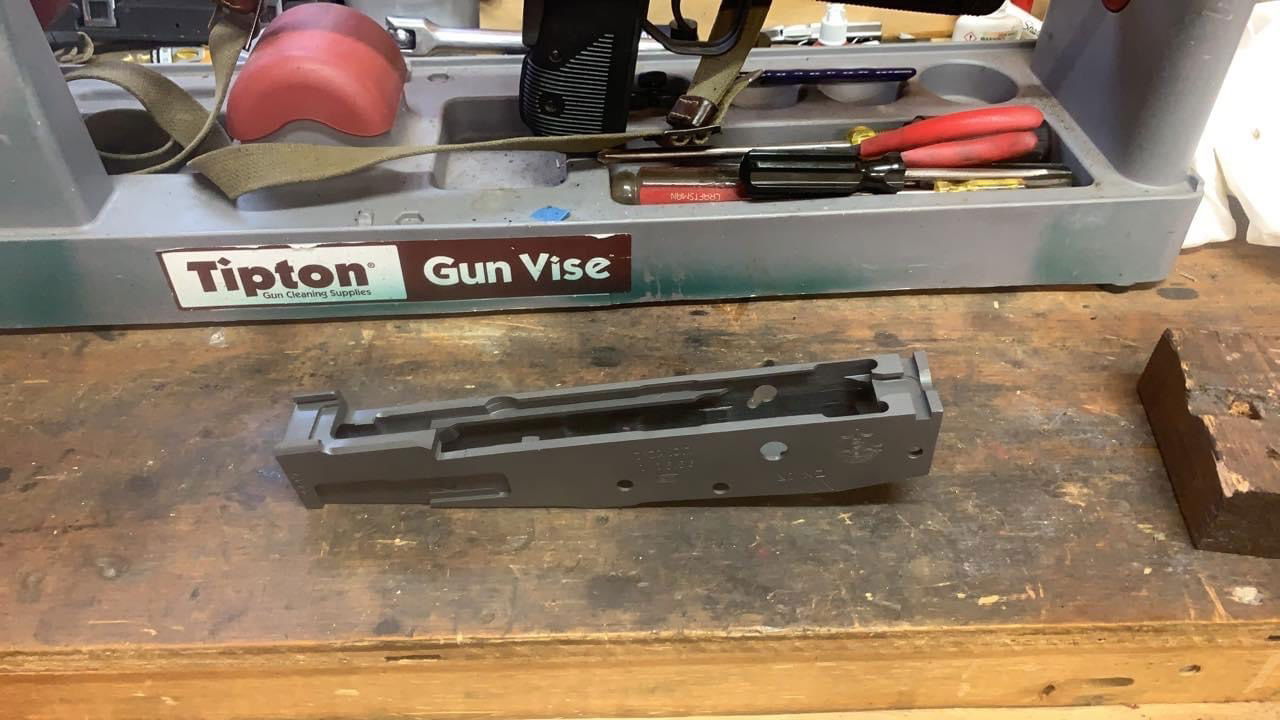
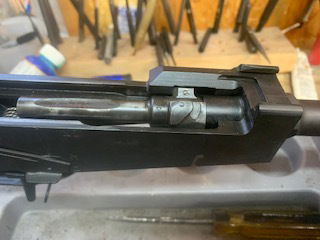
This first thing I'm going to do is check the fit of the reclaimed parts to the receiver. The bolt carrier, top cover, and magazine well. I'll make some adjustments to the parts as needed so they fit. The bolt carrier didn't want to slide on the receiver rails, so I'll use a flat file and a permanent marker to see where it's hanging up and open up the guides on the carrier. Once I've got the bolt carrier moving properly I'm going to use a little cold blue to protect the metal. I'll check the top cover by installing the gas piston tube and attempting to install the cover. It should be tight but this one won't lock into place, time for some more file work. Now that the cover is fitting properly it's time to move on to the assembly.
Next I need to get the bullet guide riveted in. I'll set my bullet guide in the grove in the receiver, before I rivet it in place I need to make sure the bolt will rotate in place, It doesn't, so I'll take a look an see where the interference is, It looks like there's some left over metal from the receiver milling, I'll take a file to it and now it drops into place and the bolt will rotate, I'll set the guide and place the rivet. After getting the proper placement of the bullet guide it's time to set the rivet, this is the biggest rivet I'll have to set for this project and I recommend using a press to do it. When I press the rivet it's important to make sure that the rivet head is flush with the guide. If it's not it will cause feeding issues.
I'll move on to riveting in the magazine catch and trigger guard. I need to support the receiver to do this so I've got some special tools that I borrowed. I'll start by setting the rivets for the magazine catch. These can be a pain to set because of their location under the bolt carrier rails and once again I'll be using the press to do it. Before going any further I'm going to check that magazines lock into place. Great, they are locking in and only coming out when I hit the release. Next is the trigger guard. I'll hinge it into the magazine catch and get the rivet hole lined up. I'll use the same process as before pressing it in. That's as far as I'll go on the receiver.
Now that all the rivets on the receiver are done it's time to install the barrel. Getting barrel installed and properly timed. Unlike the AKM that has a pressed and pinned barrel, the Galil uses a threaded in barrel like the AK-47. I've got a virgin barrel from ATI. Luckily this one has flats on the barrel like the original Israeli barrels. Once It's threaded in to the shoulder I'll support the front trunion of the receiver by placing it in my press so it doesn't get warped, and use a crows foot and Torque wrench to set the barrel to 120 foot pounds of torque. 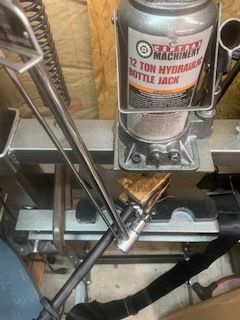
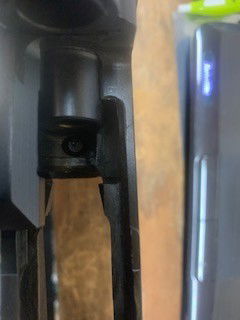
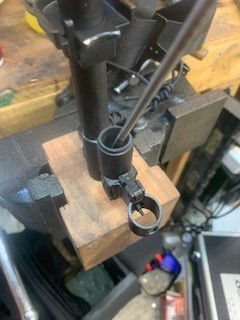
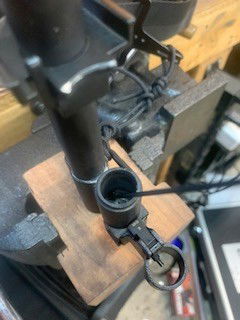
Next I need to get the front hand guard retainer on before setting the gas block. The front hand guard retainer just slides onto the barrel. And I'll cut the locking journal in the barrel for the handguard retainer. The Galil handguard is a three piece design with a front retainer, handguard, and rear retainer and springs that hold tension on the rear retainer of the handguard. Those springs need to come out. With the springs removed I can get the fit right. There should be a gap between the rear retainer and the handguard, I left a gap of 5/64” this allows the springs to compress enough to get the front retainer to lock. I've got the hanguard where I want it I'll mark the position of the front retainer so I know where to make the cut. My barrel stub from the kit had a cut of 0.870” in depth, 0.480” in length, and 0.200” in width, So a 5mm ball face end mill is what I'll use. (If you don't have a milling machine a 5/32” chainsaw round file can be used too. It just takes longer to cut the journal.) Now I'll reinstall the springs and fit it all together.
Now I need to get the gas block on and properly aligned. I've got a special support tool for this. (I made an alignment dowel from some threaded stock I had and place it in the pistol grip hole) Now I'll put the front sight on the gas block and get it as close to mechanical zero as I can. The gas block slides over the barrel until it gets to the journal it's pressed onto. Using my rod I'll visually align the rod and the front sight. Once I've got it aligned I'll give the gas block a couple of light taps to get it started and recheck my alignment. OK, I'm satisfied that it's aligned and now I'm going to press it into position using a generous amount of anti-seize on the barrel. (But what about the gas port from the barrel?)
There are two schools of thought here. One you can drill a 90 degree hole before setting the gas block like the AK-47 and let it eat, or you can press on the gas block and drill a properly aligned gas port hole like the Galil. I'm going to do it the right way and this is why I saved that piece of barrel.
Back to pressing on the gas block. I've got my gas block aligned where I want it and now I'm going to use the press to set it. I'll support the front of the gas block and press it from the back of the barreled receiver. (Do not press on the back of the receiver. It will destroy it.) I'll use a special jig that supports the barrel and receiver, placing it on the barrel face and passed through the top of the receiver. Pressing the gas block on should be done slowly and I'll check my progress frequently to ensure that it hasn't moved out of alignment. Now I'll slide the gas piston tube in place and check everything for fit. I'm satisfied that it's all in place and properly aligned. Before I drill the gas vent I'll set the gas block pins, I'll use an 1/8” drill bit to make the journals for the pins. I want to set the pins now so the gas block doesn't rotate while I'm drilling the gas vent hole. I don't think it will with the amount of pressure it takes to set the gas block but why take a chance. Now that the gas block is set and pined I'll dill the gas port hole.
Drilling the gas port hole. I took some measurement of the port from the old barrel. At it's widest it's 0.150” wide and 0.333” deep which works out to a #25 size drill bit. I'll use the gas block as a guide for the proper angle, which is 24 degrees. I'll mark the starting point of my bit to a reference point on the block and set my drill press for a 0.330” cut depth. I'm also going to insert a .223 cleaning rod in the barrel to ensure that when I break through the bit doesn't hit the other side of the rifling. So now that the big cut is done I'll make the actual port into the bore. I measured the size of the port in the old barrel and it comes out to 0.082”. I'm going to use an extra length #50 size drill bit. (When using these extra length drill bits, especially one this small you want to use light pressure and let the tool do the work. If it breaks off in the hole you're screwed.) Making that last cut into the bore was the most heart stopping moment of this whole project. These holes are drilled blind and you have to feel the tools working to ensure you're getting a proper hole. I recommend using a hand drill for this, a brand new drill bits, and a lot of cutting oil. (Make sure that all the chips and cutting oil from cutting the vent hole get removed from the gas block otherwise they'll end up in the gas system the first time the rifle is fired. To get them out I'll plug the chamber with a spent 556 case and blow compressed air in the muzzle.) Now that the gas block and vent hole is done I'll headspace the bolt and barrel.
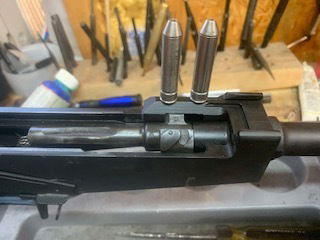
Headspacing the bolt and barrel. Headspace is critical to safety and proper function and If your not familiar with setting proper headspace it should be done by a gunsmith. Luckily I am a gunsmith and I know how to do it. Setting headspace begins with two gauges. A GO and NO-GO gauge. I've got to disassemble the bolt by removing the extractor so the back of the gauge rests on the bolt face. That task complete I'll install the bolt on the carrier put the assembly in the receiver. The Galil is headspaced off of the back of the bolt locking lugs. (Never install the operating spring or let the bolt slam into the gauges, it will ruin them, only use slow hand pressure and never force it, if it doesn't close adjust the headspace.) I'm going to first just try to close the bolt into battery on an empty chamber. It's really tight so I already know that the headspace is short. Now that the bolt will turn into battery I'll put the NO-GO gauge fully in the chamber and push the carrier forward like it's loading a round. The bolt doesn't lock into battery, and that's good. Now I'll remove the NO-GO gauge and insert the GO gauge, run the bolt forward but it still doesn't lock into battery, that's also good. To adjust the headspace I'm going to use some automotive valve lapping compound on the back of the bolt lugs. I'll work the bolt with the compound in and out of battery checking frequently with a live round and the GO gauge, when the bolt is tight on the go gauge and closes on a live round the headspace is set. Next I'll take NO-GO gauge and check that the bolt doesn't rotate into battery, it doesn't and the headspace is set. I'm going to reassemble the bolt and set it aside with the carrier.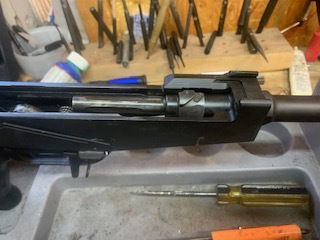
Cutting the extractor cut. AK designs have an extractor cut on the barrel face. I've measured the old cut and it's 0.033” in depth from the barrel face. I'll use jewelers file and make reference marks for the limits of my extractor cut and use the vertical mill to make the rest of the cutout, then clean up the surface with a flat file if needed. The extractor cut doesn't need to be deep, just enough the the extractor doesn't hang up on the barrel face. Some Galil builders will tell you that you don't need the extractor cut because the extractor sets back in the bolt and that may be true, but IMI put it there for a reason.
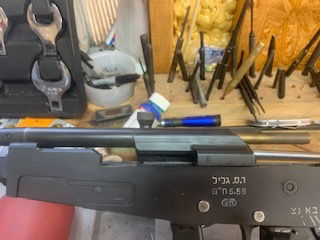
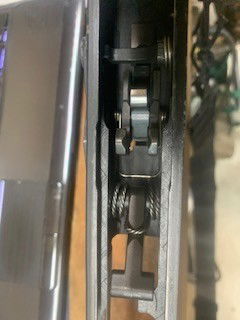
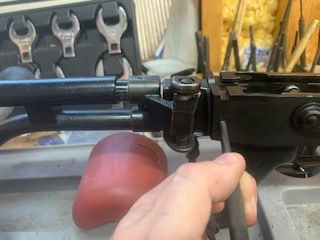
Now that the hard parts are done I'll start putting in the fire control group. It goes in just like every AK pattern rifle, except it doesn't. The Galil has a unique fire control group. It has two selector switches. One on the right side like every other AK pattern rifle and a thumb selector on the left that protrudes out the bottom of the receiver. The Galil selector works like all other AK's the top position is safe, the middle position is automatic, and the bottom position is semi-automatic. Which means the thumb safety is backwards. The forward most position is safe. The middle position is automatic, and the rear most position is semi-automatic. It takes some getting use to. The trigger goes in first with the spring and the the hammer with the spring. Then the shepherds hook spring to hold the hammer and trigger pins in place. Now I'll install the selector switch. The thumb selector goes in first by rotating it 45 degrees to fit it through the slot cut in the bottom of the receiver and then rotating it flush with the receiver. Place it in the detent hole in the receiver. Next is the AK style selector, turn it up to 45 degrees so it fits through the slot in the receiver and place it through the hole in the thumb selector switch. I'll check it for function and tweak it so I get smooth and positive operation of the selector.
Now I'll install the flash hider. It gets threaded on and torqued into place. The original was also pinned, but I'm going to omit the pin because I may want to change out the flash hider later for one that is compatible with a silencer. I'm just going to use blue thread locker to hold it in place.
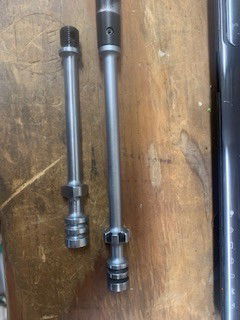
The last thing I need to do is change the piston. This kit was for from a Galil SAR and the carrier has the shorter gas piston. I'll drive out the roll pin and put the AR piston on, just thread it in until the pin holes line up and pin it back in place. It should be some what loose.
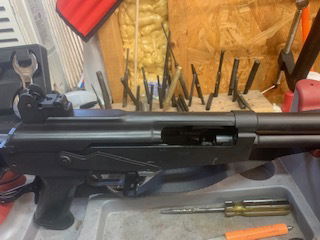
Final assembly. Now that all the machining and building is done It's time to assemble the rifle. I'll put the pistol grip on. It goes together and is held in place with a screw and nut assembly just like every other AK. Now for the butt stock, The buttstock slides in the the rear of the receiver and is held in place by a large roll pin, some times the fit can be tight and it has to be tapped in. Now with the furniture on it's starting to look like a rifle. I'll install the gas piston tube and put the bolt and carrier in, the operating spring and guide and finally the top cover. These top covers can be a bear to put on, unlike AK, the Galil top cover also has the rear sight so the fit has to be tight and this one is tight. Now I've got a complete Galil AR. 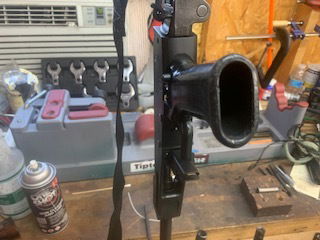
I'll perform a function check using some 556 snap caps to make sure it's feeding and ejecting properly. Then take it apart again to refinish it. I'm going to refinish this rifle with KG Gunkote 2401F Flat Black. In my opinion KG Gunkote is the best refinishing product on the market and I use their products exclusively for all the refinishing work I do. This finish will protect the rifle and is as close to the original finish as I can get.
Final Thoughts and range time. With the rifle complete and the weather warming up again it's time to get the Galil out to the range for sight in. I'm not expecting sniper rifle like accuracy out of this rifle.

The Galil sights are set for 300 and 500 meters and I'm going to zero it for 300 meters. The Galil AR ran flawlessly on the steel and with it's weight and small caliber it's one of the most fun 556 rifles to shoot. I can check another rifle off of my bucket list.
The best advice I can give you if you decide to take on this project your self, is to go slow and test fit every thing as you go. It will not go together like an AR, and it requires hand fitting every part. The Galil is a heavy and outdated design that many people weren't familiar with until IWI released the new Galil ACE and several US companies started making Galil ARM clones. I'll enjoy this Galil AR for a long time.
Enjoy Shooting, Go burn powder.
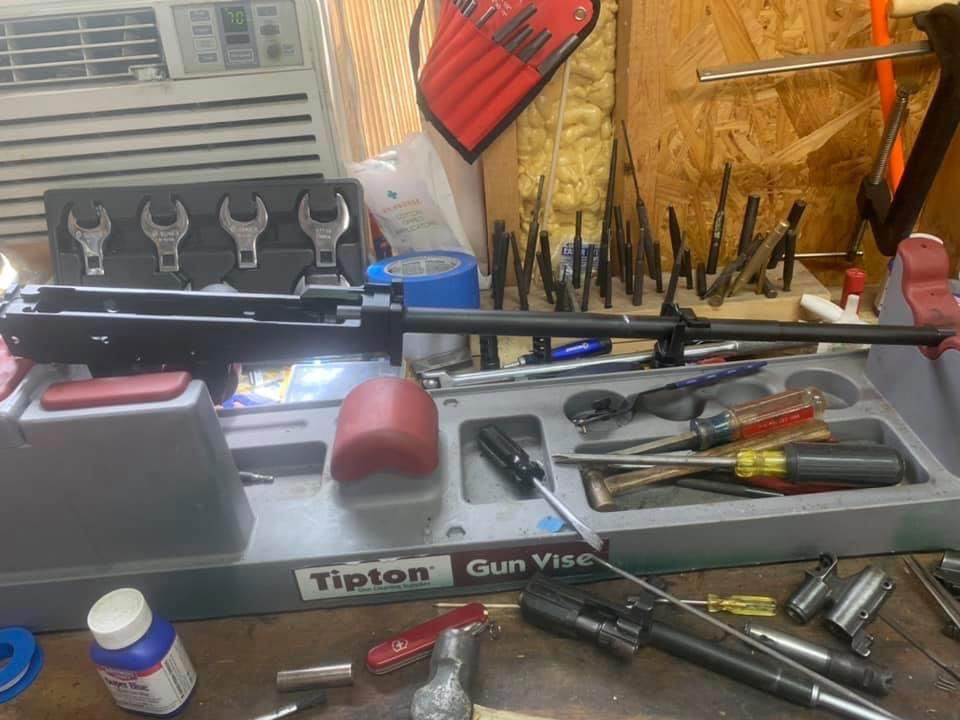
Tools Used for this build.
Auto center punch
Various drill bits
Various punches
Various hand tools
Rotatory cutting tool
Round and flat files
#50 long shank drill bit
#25 long shank drill bit
5mm ball face end mill
Vertical milling machine
Vertical drill press
AK rivet setting kit
AK receiver jig blocks
AK gas block jig
12 ton hydraulic shop press
.223 headspace GO and NO-GO gauges